Introduction
This guide explains how to install and use TEOS Connect to mirror content from a Windows or Mac computer to an Android device.
TEOS Connect Description
Great for collaborative work sessions, TEOS Connect makes it easy for employees or guests to present wirelessly from their laptops on Android devices.
TEOS Connect makes meetings more efficient and less stressful, with quick set-up and no messy wires to worry about. There’s no extra hardware.
Up to four TEOS Connect users can share their device’s screens simultaneously on an Android Professional Display, so it’s ideal for collaboration and group work, allowing users to easily participate and share ideas.
Requirements
- A Professional Android BRAVIA or an Android Player for TEOS compatible with TEOS Connect.
- A computer running Windows 7 (or above), TEOS Connect Client version 1.6.4.0
- A Mac running macOS 10.10 (or above), TEOS Connect client version 1.0.9
- Android 5 to 8.1 (on Google Play) and 9 or above by manual installation, TEOS Connect client version 1.9.8.13
Contents
Download TEOS Connect
If you do not have TEOS Connect software on your computer, you can download it directly from the meeting room display.
To obtain the TEOS Connect software, please follow the on-screen instructions, depending on the access you choose.
Access to the download page
Local Access
To access the download page, open your web browser and enter the address visible on the screen:
http://teos.work (the device needs to be connected to the internet to access this URL)
You can also type the IP address of the device shown in “Mirror on X.X.X.X” in your web browser:
http://ipaddressofdevice:9020 (no internet access is needed, only access to the device)
Download the software
After opening the web page in your browser, you will be able to choose between a Windows or Mac version.
If you are a Windows user, please click on the Windows logo.
If you are a Mac user, please click on the Apple logo.
The download will start after clicking.
After the download is complete, you will be able to open the program by double-clicking on it.
Please note this file will always be the file to use to open TEOS Connect. It does not require specific installation and can therefore be easily used by guests.
Download TEOS Connect Receiver
To make a connection to a device, the application TEOS Connect Receiver (1.9.8.13) needs to be installed on said device to receive the connection.
This can be done in multiple ways.
Download the application
To download the application, navigate to https://teos.solutions/en/Resources.
Download the TEOS Connect Receiver 1.9.8.13; this needs to be installed on the end device.
TEOS Manage
If the end device is already connected to a TEOS Manage server, the application can be installed through TEOS.
Log in to the TEOS Manage server.
Navigate to “Site Management > Service Management”.
Select the Android icon next to the desired device.![]()
Select “Test ADB”, and then select “Next”.
Open the “App Settings” and select “Install” at the end of “Other apps”.
Select the “Browse” option to upload the downloaded TEOS Connect Receiver application.
Select “Next”, and then “Install”.
TEOS Connect Receiver will then be installed on the device. After installing, the message “Installation successful” should appear.
TEOS Connect Receiver has now been installed.
ADB
We can use a remote ADB connection to install TEOS Connect Receiver on the device.
See the following documentation on how to connect to a device using ADB:
How to enable ADB/USB debugging
How to connect to a device using ADB
After making a connection to the device, use the following command to install TEOS Connect Receiver on the device:
ADB install ![]()
TEOS Connect Receiver has now been installed.
USB
This method installs TEOS Connect Receiver by using a USB stick. This process can differ based on device type. In this example, a Sony Bravia display will be used.
First, connect the USB stick to your computer and place TEOS Connect Receiver in the root of the USB.
Now plug the USB stick into the device where TEOS Connect Receiver needs to be installed.
Make sure the Sony Bravia is in “Pro Settings Mode”, and navigate to the Pro Settings.
Now search for the “Install APK” option.
The USB and the application on it should be detected. Select it to start the installation. 
Next, select “Install”, and then “Done”.
TEOS Connect Receiver is now installed.
Connecting to a display
After opening the TEOS Connect software on your computer, you will see the application interface, shown below.
Generating the list of displays
An automatic scan of the network will be performed to discover the available displays. In case the display you want to connect to is not in the list, you can still add it manually by clicking on the “+” button. Please see the troubleshooting section for more details.
Search functionality
Clicking on the device dropdown also gives you the option to search for a device by typing a
part of the name or IP address. This search functionality is not case sensitive.
Naming your displays
If a display is already in your TEOS, it can show as just an IP address, but it can also show with a name given to the display’s TEOS Connect by the administrator or configuration manager. If an administrator or configuration manager has set a name and activated the welcome screen, it will show this name on the welcome screen.
Edit
On your own TEOS Connect on your computer, you can set this name to any name you choose. This can be a different name than what is shown on the welcome screen if this is activated. Of course, you can also choose to use the same name.
To do this, select the device first in the devices dropdown, and when you have selected the device, you can right-click the name. A pop-up will show with Edit and Delete.
If you click “Edit” the following screen will open: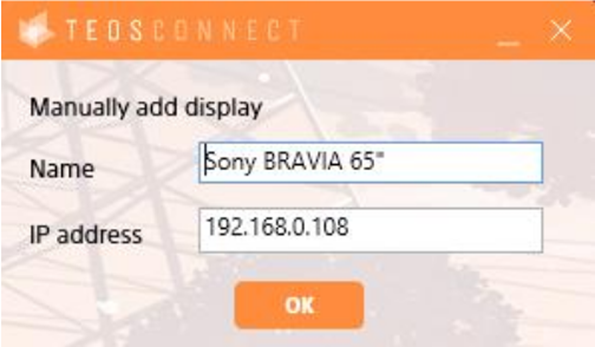
Here, you can change the name and IP address of the device if these might have changed on the display.
This name will be saved on your computer until you delete the device from your list again.
TEOS will show the name given to the display again when restarting TEOS Connect on your computer.
Delete
To delete a device, you can just select a device in the devices dropdown. Then right-click on the device and click Delete.
Mirroring to a display
Select the display you want to mirror to, then click “Connect”.
The display will automatically generate a 4-digit security code that you need to enter in the new pop-up box on your computer:
After entering the code, you can click Start (or press Enter) and the display will start casting your desktop.
If you are using TEOS Connect frequently, it is recommended that you download the software and place a shortcut on your desktop for quick access.
Welcome page
If TEOS Connect is being used with TEOS Manage, you can customise the welcome page.
Mirroring solution
Navigate to “Workplace Solutions > Mirroring”.
Select “New mirroring solution”.![]()
Give the solution a name and select the template, then select “Save”.
On the right side, you can select the page that is being used for mirroring.
From here, you can edit and adjust the mirroring template as desired.
Assign the solution to a device
Navigate to “Administration > AV Devices”.
Edit the device you want to use the mirroring solution on and navigate to “Mirroring Settings”.
Under “Mirroring Template”, select the template you created.
You have now successfully created a mirroring solution.